

Garrison Joe, SASS #60708
-
Posts
11,911 -
Joined
-
Last visited
-
Days Won
5
Content Type
Profiles
Forums
Events
Everything posted by Garrison Joe, SASS #60708
-
Yep, those look correctly installed (from what the pics show), and nicely lubed where spring tip meets the lever bosses. VERIFY that there is about 1/8" clearance between the outside bend of the spring and the cover plate which fits next to it. It is common that the after-market spring tips are made over-length and need to be shortened. IF the tip is too long, THAT creates can put a lot of stress on the lever or lifter arm. As well as making the levering action rough and harder than required. good luck, GJ
-
One can also use a sharp narrow cold chisel, catch a rough spot on the break surface with the corner of the blade, and drive it CCW with some taps. If nothing exists to catch, then one can drive up a burr with a center punch enough to start working the screw out. Or drill a small hole at the edge of the break surface with a dremel tool and a carbide point to serve as a grabbing spot. good luck, GJ
-
It's going to be soft solder, so it's able to be repaired without the solder on the barrels-to-ribs junctions being softened when the lug is attached. I'd certainly recommend Briley to do this - all they do is shotgun work, mainly on high-end guns, which an SKB is close to being. Either them, or Art's Gunshop in Hillsboro MO, who do a LOT of high-end side-by-side and O/U barrel set repairs..... https://artsgunshop.com/contact-us/ Cost is often pretty high on this because it can often require re-rust bluing the barrels after the soldering. If you do not care if the bottom of barrel area is left "de blued" or even just can be cold-blued to get a "fair match" of color, mention this and they may be able to reduce the cost. good luck, GJ
-

Tried a cascade pod as a case cleaner tonight
Garrison Joe, SASS #60708 replied to Roland Thunder's topic in SASS Wire
Pods have way too much detergent in them for a tumbler container and are expensive. If a pod works, so will a half a teaspoon of much cheaper liquid detergent. Just my informed guess. GJ -
If that is a flat nosed bullet, and you have a round nose shape in the bullet seater die stem, I'd contact RCBS and ask for a flat nose seater stem for the die. good luck, GJ
-
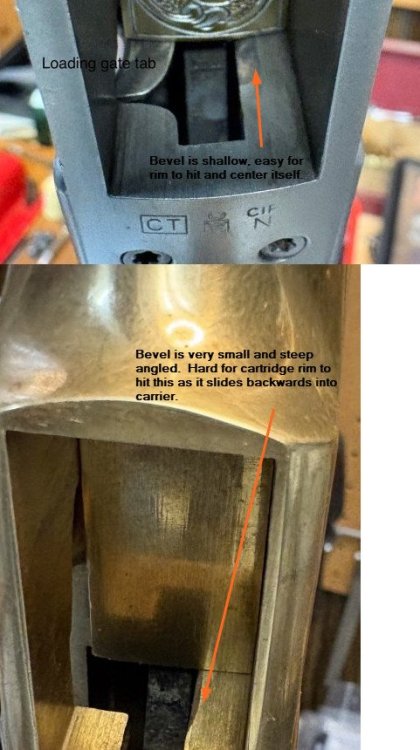
Gun nomenclature for DIRECTIONS are given in the "standard" orientation of the firearm. As if you are holding close to the back (butt or grip) of the gun, gun upright and pointed down range. For maintenance / gunsmithing, cartesian coordinates are seldom used - most folks have no 3-axis measuring equipment or machine tools to be able to use them. So, let's amplify the shorthand I used, and say, the bevel is made "wider" by extending the bevel surface at the vertical edge window frame to the left. The existing factory angle for the bevel is made shallower - there is no real direction for the angle - you are retaining the same vertex of the angle, and reducing the "included angle" from the surface of the frame to the "hypotenuse" (surface) of the bevel from 60 to 30 degrees - thus no direction involved with "shallower." Guns past the CNC machining stage are not normally dimensioned in x-y-z cartesian coordinates from some reference point. The directions within guns get described left-right, up-down and forward (down range) and backward or rearward (towards the user). As has been done for a long time, especially by gunsmiths. I'm an engineer by training and practice, and this "antique" nomenclature for directions, although sometimes clumsy, is very natural if you "put yourself in the shooter's mindset." But, when I write for other shooters and smiths, I will not show cartesian coordinates on anything I cook up. (Guns are close to a rectilinear two-dimensional system if you look closely at how parts are usually designed and operated, since motions are largely axial aligned to some sort of bore, including rotating in a bore, or rotating around pins.) good luck,, GJ
-
I was talking about changing the angle of slope on the bevel on the left side of the mortise (window) in the frame where the loading gate and carrier meet. Shallower means the angle has to be altered from fairly steep angle (like, perhaps 60 degrees from the face of the rear surface of the frame's carrier shaft, to more like 30 degrees referenced to the frame face. Thus, shallower angle. Thus, easier for the rim of the cartridge to slide around on the bevel as the carrier starts to rise. Wider is what results when you make a bevel shallower and leave the vertex of the angle (at the left side of the window) in the same spot. With "included" angle of the bevel going from 60 degrees to 30 degrees, and the opposite side (the frame thickness) staying constant), the hypotenuse of that included angle becomes longer, thus looking at the bevel from where the carrier shaft is, the bevel surface "looks wider." "Shallow" really can only apply to the angle of the bevel in this example. "Wider" can only apply to the angle's hypotenuse (beveled surface of the cut in the frame). High School Geometry is your friend in working this problem. good luck, GJ
-
At this point, I'd work the bevel on the left side of window, the blue area I posted a picture of earlier. Make it wider and "shallower". Good luck, you are on the trail now. GJ
-
Nope, aluminum and brass are close to same strength at resisting abrasion. MIGHT remove anodizing, though. If it's got to "stay pretty" - test an old anodized part you don't care about. GJ
-
Another Scammer!
Garrison Joe, SASS #60708 replied to Randy Saint Eagle, SASS # 64903's topic in SASS Wire
ALWAYS run away from any request to use a "no refunds" payment method. Zelle, Bank Transfers and PP Friends and Family (I call them Fiends) all are giant flags that someone is fishing for your money! Also, any request for gift cards! GJ -
I guess you did open that bevel up! Hope it works well. GJ
-
73s don't need all that much front-of-gate-spoon width. Sure your 60 needs to be wider than factory made it? GJ
-
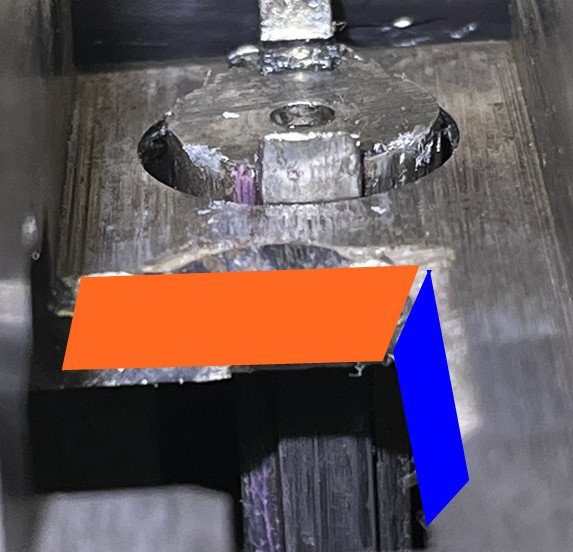
Think you are having just about the same mechanical catching on the frame of the gun as the rounds are levered up as happens with some 73s and 66s. The instructions on Pioneer Gunworks for fixing the loading gate mortise bevels appears that it would fix this gun as well. Hit this link Pioneer Technical Info Page then open the downloadable instructions: Frame Modification for 1866/73 (Round Alignment Fix) But you will have to be the one to figure out if this is a good fix for your gun. I've not applied it to a Uberti 1860. Where cartridges normally jam in most toggle link guns is the rim sits to the right as it ready to be levered up. And that is usually because the bevel on the frame's left side is not gentle enough) to let the cartridge reliably self-center. Comparing your two photos above, one of a 66 and then the next photo of your 1860, I can see the bevel cut in the frame is a very different angle and size. good luck, GJ Then the next bevel to check is the one at the TOP of the window (mortise) cut in the frame. Which is covered by the carrier in both of these pictures. That bevel needs to be cut about like the orange area shown in this next photo: This "top of window" bevel is REALLY what helps force the cartridge slightly forward as the carrier begins to lift, which keeps the rim from jamming against the back wall of the frame (the point just below where the bolt comes through the frame). good luck, GJ
-
Slicking up a single shot for a Buckaroo
Garrison Joe, SASS #60708 replied to July Smith's topic in SASS Wire
Basically, lighten springs that are used to resist action opening, perhaps polish the hinge knuckle or the forearm iron contact point a little, look for any obvious drag marks on the action and polish that area. BUT - Not a lot of single shots are being used in the sport even by buckaroos. I tried to fix one up for SASS, and the young shooter did not like the recoil of a short Win 37 single shot with even VERY light 12 gauge shells. GJ -
[Fixed!] Another Stoeger SxS Not Staying Locked
Garrison Joe, SASS #60708 replied to John Kloehr's topic in SASS Wire
When I work on something like this with hand tools, I use files first to get rough shape (using fine teeth files - usually sets of needle files). Fairly light pressure and lots of attention to making a consistent cut across the face of a section which should end up "planar" (a flat). A sharpie applied before filing tells me where I am "out of flat" after a couple of light strokes. As things get functional, switch to hard "trigger" stones - either very fine carborundum or hard Arkansas or diamond-coated "stones." Light pressure on those, too. Even for triggers and sears, that usually puts on a "smooth enough" finish for shotgun actions. If I need super-polish, then out comes the electric die grinder motor (like a Foredom) and Cratex tips - use very carefully. Or some grinding compound on a scrap piece of steel or glass that fits the work. good luck, GJ -
Cleaning cartridges
Garrison Joe, SASS #60708 replied to Aravaipa Al, SASS #39492's topic in SASS Wire
Mineral spirits are fine....don't soak them though, if the crimp is weak, fluid can get into the powder or even primer. I clean ALL my loaded ammo in my vibratory bowl cleaner to remove bullet and case lube left on them, with lizard litter, a dryer sheet and a cap of mineral spirits in the full bowl. In 30 minutes, clean and even polished, and never had a failure to fire (or damage to the rounds). good luck, GJ -
Best way to remove (what I think is) Renaissance Wax
Garrison Joe, SASS #60708 replied to JackSlade's topic in SASS Wire
If you have to use an abrasive material, use the plastic scrubbing pad or bronze wool. Steel wool will cut into the frame surface, leaving small scratches. Neither of the alternates will do that. GJ -
[Fixed!] Another Stoeger SxS Not Staying Locked
Garrison Joe, SASS #60708 replied to John Kloehr's topic in SASS Wire
Since you are making contact now on the rear barrel lug (the blue mark), but probably not getting all the way into the rear barrel lug with the locking bar, you may next need to start working a bevel on the underside of the locking bar at position I ("india" phonetically) that matches the angle of the rear barrel lug. Take a little off, and check if the touching (blue) mark moves slightly forward because now the bar can go slightly farther forward because of the bevel clearing the lug surface. Be sure you are checking the fit between the barrel lugs and the locking bar while parts are outside the action, too - because the view is so much better doing that. That is your best guide for getting a great close fit between the lugs and the bar. Just slide the lock bar into the lugs the same way the opening lever and receiver do it. You should real soon now start to mark (come into contact with) the front lug surface, too. Sounds like you are on the right track! GJ -
[Fixed!] Another Stoeger SxS Not Staying Locked
Garrison Joe, SASS #60708 replied to John Kloehr's topic in SASS Wire
You DO NOT have to have the vertical front end of the bar to touch the vertical front lug cavity wall. So, I'd take metal off the front of bar to the point that something else limits forward travel. Here is where your dychem or sharpie or prussian blue comes in for tagging the tight spots. GJ -
Best way to remove (what I think is) Renaissance Wax
Garrison Joe, SASS #60708 replied to JackSlade's topic in SASS Wire
Renaissance wax is just a micro crystalline petroleum-based wax. Great for shine, poor for rub off protection. If it's flaking, peeling, hard to remove, its not Ren Wax. They could have sprayed/dipped a poly in several colors to try to look like CCH. GJ -
Best way to remove (what I think is) Renaissance Wax
Garrison Joe, SASS #60708 replied to JackSlade's topic in SASS Wire
Well, that doesn't sound like most "archival" wax I've dealt with - which should strip easily with toluene or acetone. Could be lacquer - so lacquer thinner would cut it. Most likely it's clear coat polyurethane spray . That probably needs soaking with Citristrip and a plastic wrap to keep the solvent from evaporating. At least you don't have a valuable finish under it, so you can really do whatever you need to do to clean it up, just recoat with good rust preventative. good luck, GJ -
Yes, Winchester quality control while making shotshells has gone in the toilet over last 10 years. Yes, most shotguns are not well made enough to shuck shells the way that SASS rules allows ("manual ejection" from double guns). Yes, most factory loads are hotter than needed to knock down our targets at 6 to 10 yards. Hot loads stick in chambers worse. So, fix all three. Tune the shotgun to be slick around the chamber and extractor. Run good quality Remington brass head cover hulls (STS or Nitro 27). Load your own lower velocity lower recoil shells (7/8 ounce at 900 FPS is PLENTY). NO factory load right now is optimal for most shooters in SASS. good luck, GJ
-
Perhaps restricting the posting of images should be the privilege of an active member only, leaving reading our sites and even posting text free to vetted public "users." good luck, GJ
-
Buffalo Arms has a fair selection, if you don't do woodworking. Cross Sticks Selection good luck, GJ
-
[Fixed!] Another Stoeger SxS Not Staying Locked
Garrison Joe, SASS #60708 replied to John Kloehr's topic in SASS Wire
What you are calling tangs are normally called the locking lugs. So, if I get your drift, right now with the action closed, the locking bars do NOT contact any part of the lugs except at the vertical part of the front lug's recess. But, that would provide no amount of locking at all. The lock bar surfaces must "off" of contact with the horizontal parts of the locking lugs, meaning they were poorly fitted at the factory (or later). You probably need that new locking bar, IF the old one shows file marks from being thinned. BUT - if the original locking bar has it's full thickness, then metal has been removed from the locking lugs (always the wrong place to try to make a double work better). A good TIG welder could close up the recesses on both front and back lug, then refit by filing to fit a full thickness locking bar. good luck, GJ


