Big Hand Zack Posted May 25, 2020 Share Posted May 25, 2020 Hello all. Recently picked up my 2nd SASS pistol in a trade, an Uberti Cattleman Hombre in .357. I have been practicing a lot, both dry fire and live shooting. The other day the cylinder started turning a little rough only when loaded. I inspected The firing pin hole and found that the metal on the rim of the hole is getting pushed out slightly making a small berm/burr, which is rubbing on the cases when loaded. The pistol appeared to be barely fired when I got it, and the guy who traded it confirmed he did not fire it much. Only rounds I've put through it are my light .38 loads (125 TC over 3.0gr Titegroup) Is this normal for a lower end single action like this? Not that its lower end but the more value based pistols. Is this as easy as filing down that bur? or is this something I should be contacting Uberti about? Link to comment Share on other sites More sharing options...
Nickel City Dude Posted May 25, 2020 Share Posted May 25, 2020 I would just file it down but a call to the importer would be in order especialy if it happens again. Are the firing pin strikes in the center of the primer? Link to comment Share on other sites More sharing options...
Abilene, SASS # 27489 Posted May 25, 2020 Share Posted May 25, 2020 You can stone the burr flat. Are you using snap caps for dry firing? Link to comment Share on other sites More sharing options...
Warden Callaway Posted May 25, 2020 Share Posted May 25, 2020 Situation normal. Just hone off the burr. Maybe get some snap caps to help keep firing pin from slamming into bottom of hole. Link to comment Share on other sites More sharing options...
Tequila Shooter Posted May 25, 2020 Share Posted May 25, 2020 I'd think a little light filing with a diamond file would be ok. I'd suggest if you're doing a lot of dry firing to use snap caps, that may be the cause of the issue. Link to comment Share on other sites More sharing options...
The Original Lumpy Gritz Posted May 25, 2020 Share Posted May 25, 2020 Soft metal, common issue on European cowboy guns. Slide a steel dowel rod down the bbl, it must exit the muzzle, and carefully tap the dowel to reduce the protruding area around the FP. OLG Link to comment Share on other sites More sharing options...
Warden Callaway Posted May 25, 2020 Share Posted May 25, 2020 P.S. While you have the hone out, polish the recoil shield some and make a ramp of that ledge on opposite side of loading gate. Link to comment Share on other sites More sharing options...
Warden Callaway Posted May 25, 2020 Share Posted May 25, 2020 5 minutes ago, The Original Lumpy Gritz said: Soft metal, common issue on European cowboy guns. Slide a steel dowel rod down the bbl, it must exit the muzzle, and carefully tap the dowel to reduce the protruding area around the FP. OLG I've done that also. I has a rod with polished, rounded end that I'd gently drop against the hole until burr was hammered back in. Link to comment Share on other sites More sharing options...
Warden Callaway Posted May 25, 2020 Share Posted May 25, 2020 Crater around firing pin hole in Smokewagons. Cost $200 ea to repair. After TIG weld. Pietta has bushing in recoil shield like Colt. Link to comment Share on other sites More sharing options...
Warden Callaway Posted May 25, 2020 Share Posted May 25, 2020 26 minutes ago, Big Hand Zack said: is this something I should be contacting Uberti about? Waste of time. I have a Uberti made in early 70s that had the same problem. Every Uberti we have has had this happen. I've gotten to add to my clean and inspect routine to feel the area around firing pin hole for burr and hone off any I find. The problem seems to come up less often as time goes on. Link to comment Share on other sites More sharing options...
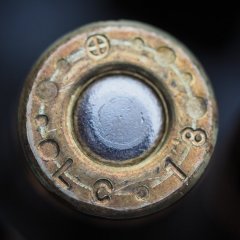
Big Hand Zack Posted May 25, 2020 Author Share Posted May 25, 2020 19 minutes ago, Warden Callaway said: Waste of time. I have a Uberti made in early 70s that had the same problem. Every Uberti we have has had this happen. I've gotten to add to my clean and inspect routine to feel the area around firing pin hole for burr and hone off any I find. The problem seems to come up less often as time goes on. Thanks for all the replies and help guys. Glad to hear its just normal for these guns. I looked at my most recent brass. Obvious on the primer of the burr, but does seem that the primer strikes are sometimes a little low, which is what I was suspecting after inspection. I'm assuming due to tolerances, and soft metal that these don't mesh perfectly and may require a "break-in" period, quite literally. Heres a pic of the brass. I'll hone down the bur, as well as the polish down the lip on the recoil shield. I'll look in my shop and see if I have some snap caps and just use those. I did order a Wolff spring kit for it as well, the hammer is quite stiff on these. Any other minor at home honing or upgrades I can do? Link to comment Share on other sites More sharing options...
Tequila Shooter Posted May 25, 2020 Share Posted May 25, 2020 Just looking at the pictures you posted it looks like the left side of the hammer might need a look, most likely it a bur or two on the frame. Otherwise I'd do a complete strip of the guns and check for burs and file them down. Be very careful if you do anything with the seer or pawl the angle and depth of seer is critical to function. Here's a video to disassemble and re-asessemble a SAA. Link to comment Share on other sites More sharing options...
Goody, SASS #26190 Posted May 25, 2020 Share Posted May 25, 2020 10 hours ago, Big Hand Zack said: I'll look in my shop and see if I have some snap caps and just use those. If you don't find any you can use some empty cases. Pop the spent primer and fill the hole with RTV Silicone. When dry trim flat with razor blade to make your own snap caps. Link to comment Share on other sites More sharing options...
Big Hand Zack Posted May 25, 2020 Author Share Posted May 25, 2020 1 hour ago, Tequila Shooter said: Just looking at the pictures you posted it looks like the left side of the hammer might need a look, most likely it a bur or two on the frame. Otherwise I'd do a complete strip of the guns and check for burs and file them down. Be very careful if you do anything with the seer or pawl the angle and depth of seer is critical to function. Here's a video to disassemble and re-asessemble a SAA. A good idea for sure. Ya the left side of the hammer has some visible scratching. Nothing I can feel but definitely there. thanks Link to comment Share on other sites More sharing options...
Big Hand Zack Posted May 25, 2020 Author Share Posted May 25, 2020 Whoops... forgot to add the pic of brass... Link to comment Share on other sites More sharing options...
Cypress Sam, SASS #10915 Posted May 25, 2020 Share Posted May 25, 2020 You can bevel the edges of the firing pin hole by placing a drill bit (Wrapped with masking tape to prevent damaging the rifling) down the bbl. Then hand turn the bit to “countersink” into the frame a little. This will prolong the life of the FP hole before you have to do it again. Don’t use a powered drill for this not even a hand powered one. Turn the bit with your fingers and keep it straight with the barrel. Link to comment Share on other sites More sharing options...
Hendo Posted May 25, 2020 Share Posted May 25, 2020 Well, now I got something else to look at on my shooters when I clean them. So there's that. Link to comment Share on other sites More sharing options...
Warden Callaway Posted May 25, 2020 Share Posted May 25, 2020 1 hour ago, Big Hand Zack said: Whoops... forgot to add the pic of brass... When I look at the primers in your cases, the deformation looks like what I saw in the Smoke Wagons that has a crater around the diring pin hole. When I blow up the picture in your original post, it looks like there is a crater circling the diring pin hole. Clean and inspect this area and see if you have a crater like in the picture below. Here is a picture of one of the ceses. If that's what you find, you're screwed. Link to comment Share on other sites More sharing options...
Cat Brules Posted May 25, 2020 Share Posted May 25, 2020 You may or may not already know the following, and if you don’t, it’s important. If you already know this stuff, then just consider this a heads-up for those who don’t. There’s a difference between “filing” (even with a “diamond” file) and, “honing”. A gunsmith’s “hone” Is usually a longish thin stone with varying grit, but usually quite smooth. Usually with firearms, these are pretty smooth, and not rough to any degree, like a file can be. A hone doesn’t take off much metal at all, and with fine work like this, that’s a good thing. Cat Brules Link to comment Share on other sites More sharing options...
Texas John Ringo, SASS #10138 Posted May 25, 2020 Share Posted May 25, 2020 You CAN install/have installed a Colt type firing pin bushing. Cost????? Link to comment Share on other sites More sharing options...
Big Hand Zack Posted May 26, 2020 Author Share Posted May 26, 2020 10 hours ago, Cypress Sam, SASS #10915 said: You can bevel the edges of the firing pin hole by placing a drill bit (Wrapped with masking tape to prevent damaging the rifling) down the bbl. Then hand turn the bit to “countersink” into the frame a little. This will prolong the life of the FP hole before you have to do it again. Don’t use a powered drill for this not even a hand powered one. Turn the bit with your fingers and keep it straight with the barrel. Thats a good Idea.. I may try that just a tad. wouldn't need much, nor would I want much of a counter sink, but in this case, just a little bit would help I'm sure. I'm also hoping that this was a little bit of a "break in", and the next time shouldn't happen so quickly, and not to such a high degree. 8 hours ago, Warden Callaway said: When I look at the primers in your cases, the deformation looks like what I saw in the Smoke Wagons that has a crater around the diring pin hole. When I blow up the picture in your original post, it looks like there is a crater circling the diring pin hole. Clean and inspect this area and see if you have a crater like in the picture below. Here is a picture of one of the ceses. If that's what you find, you're screwed. This is not what I found. the indent was INTO the primer, not the other way around. When the firing pin hole pushed metal towards the case, it made a hump of metal and as the primer round went off, it appears the case/primer pushes rearward with the pressure and the metal on the frame pushed into the primer. 6 hours ago, Cat Brules said: You may or may not already know the following, and if you don’t, it’s important. If you already know this stuff, then just consider this a heads-up for those who don’t. There’s a difference between “filing” (even with a “diamond” file) and, “honing”. A gunsmith’s “hone” Is usually a longish thin stone with varying grit, but usually quite smooth. Usually with firearms, these are pretty smooth, and not rough to any degree, like a file can be. A hone doesn’t take off much metal at all, and with fine work like this, that’s a good thing. Cat Brules I did know this, however I took a leap of faith with a few different tools as I did not own any small honing tools. Funny thing is I have 10 or so sharpening stones of all sorts for my kitchen knives but obviously those are all too large. I used some small needle files, a small chunk of 200grit whetstone, 400 then 800 grit sandpaper. Its not professional grade, but it worked and learned that I now need some small finger hones for sure lol. I didn't want to file or hone any more on the frame shield lip. I hit it hard with the 800grit and smooth as butter, but theres obviously still just a little bump but I doubt it'll impede anything at this point. Just need to grab some blueing from Brownells and should good to go. I also got my Wolff Spring kits into the Uberti and my Vaquero, so a successful day. The Uberti spring kit makes the already light trigger even lighter lol... and does lighten up the hammer a bit. I'm sure it could improve greatly with some more experienced hands and a few hours of elbow grease. The Vaquero kit was about perfect I got the 17lb/30oz kit off Midway. Trigger pull went from 3.5lbs to just over 2lbs on my Lyman trigger gauge. Picked up some black grips for the Uberti off Ebay, and after some fitting, they went in well, and I REALLY like the look of the black/black with the brass frame. Any other suggestions please let me know, all input is welcome. Both guns function checked fine and fired a cylinder full well. We'll see how the firing pin hole holds up. Link to comment Share on other sites More sharing options...
Tequila Shooter Posted May 26, 2020 Share Posted May 26, 2020 Looks like you did a fine job on the firing pin hole. The black on black looks good too. Link to comment Share on other sites More sharing options...
Cypress Sam, SASS #10915 Posted May 28, 2020 Share Posted May 28, 2020 Thats a good Idea.. I may try that just a tad. wouldn't need much, nor would I want much of a counter sink, but in this case, just a little bit would help I'm sure. I'm also hoping that this was a little bit of a "break in", and the next time shouldn't happen so quickly, and not to such a high degree. You don’t need to do more than break the sharp edge and remove the raised ridge. Link to comment Share on other sites More sharing options...
Driftwood Johnson, SASS #38283 Posted May 28, 2020 Share Posted May 28, 2020 Howdy This has nothing to do with whether you bought an inexpensive Hombre or a top of the line Cattleman. What happens is every time the firing pin 'finds its way' through the firing pin hole in the frame, it disturbs the metal of the frame a tiny bit. Eventually, a burr gets raised around the firing pin hole. Colt solved this problem over 100 years ago by pressing a hardened steel bushing into the recoil plate. The bushing is harder than the frame metal, and hard enough that no burr gets raised. You can file or stone the surface of the recoil shield flat, but eventually the problem will return. If you don't want the burr to return, you need to create a bit of space where when, not if, the burr returns it will not interfere with the case heads in the cylinder. Warden Callaway's solution is a good one. What I did years ago was I took a very long drill bit. Long enough to extend completely through the barrel and touch the recoil plate of the revolver. I wrapped the drill bit with tape so only the point was showing. Then very carefully I turned the bit by hand, not with a drill, but by hand, so that it just barely bit into the metal surrounding the firing pin hole and created a tiny countersink. It may look ugly, but it worked. Link to comment Share on other sites More sharing options...
Recommended Posts
Archived
This topic is now archived and is closed to further replies.