

Matthew Duncan
-
Posts
5,280 -
Joined
-
Last visited
-
Days Won
2
Content Type
Profiles
Forums
Events
Posts posted by Matthew Duncan
-
-
First. I'm very well please with the fit and quality of the exterior of the Sharp-tail. The guts need some work for SASS.
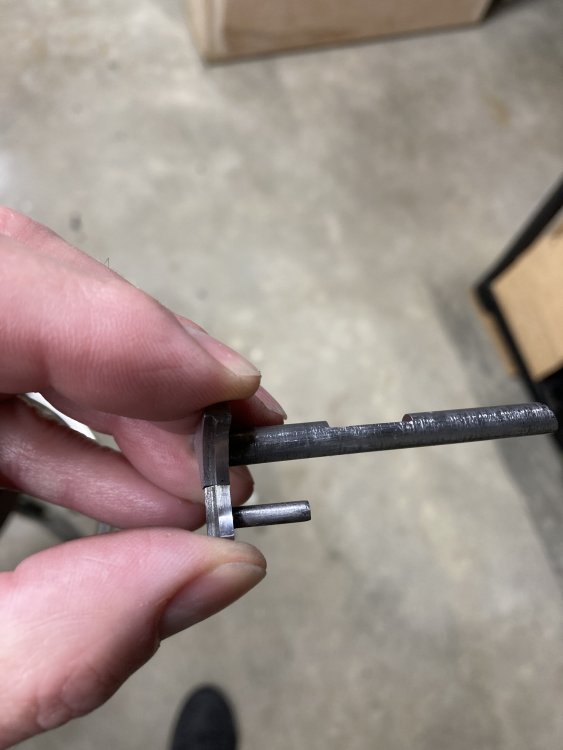
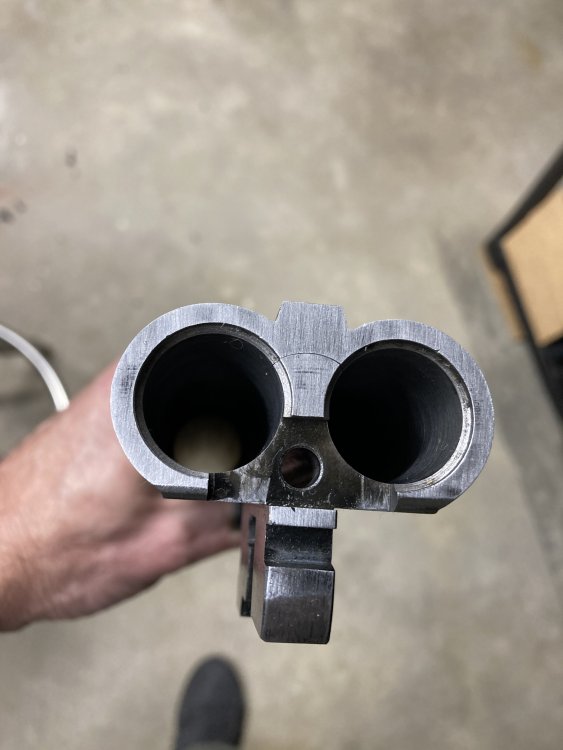
The Sharp-tail has a rather pronounced extractor and has two parallel guide rods. The bottom rod looks like the manufacturer tried to cut threads into it and didn't do a very good job. After polishing both rods the extractor would slide closed until the last 1/16", then required some force. I believe the two rods weren't 100% parallel. I noticed the last three digits of the Sharp-tail's serial number was stamp on the extractor so it must have been a custom fit.
I'm crediting Nostrum Damus and The Original Lumpy Grits for forcing me to resolve this problem.

True Gunsmith's/Craftman stop reading. You have been warned.

I dug out my Dremel tool and put a 1 1/2" cutoff wheel on it. Masking tape on the front of the extractor to draw a straight line where I'll be cutting it in two. Holding the extractor in one hand and holding the Dremel in the other resting on my leg I slowly start cutting. If I screw this up getting a custom fitted replacement will be difficult.
Insert drum roll here.
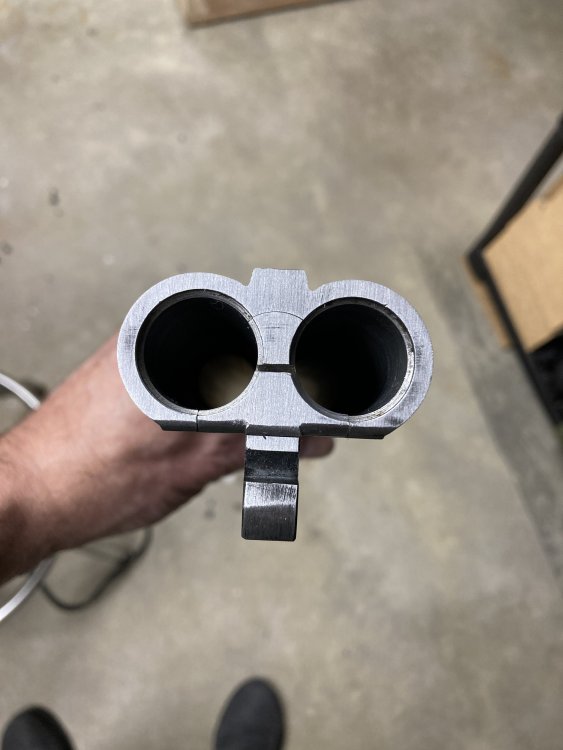
I did it. And the extractor no longer sticks in that last 1/16" of closing AND the action now opens part way with one hand! I still need to do a bit of polishing on sharp edges I created. I'm wondering if a Jeweler's saw would have made a finer cut? Any ideas, other then JB Weld, to "pin" the top part of the extractor to the barrels?
-
 1
1
-
-
On 7/10/2023 at 9:57 AM, Forty Rod SASS 3935 said:
That ain't funny.
A friend and his wife brought there granddaughter to visit and while we were on the deck enjoying the sun sh flushed full roll of paper towels. I tried everything I could think of to clear the clog and ended up calling a plumber.
He and his assistant took the toilet up, cleared the clog and reinstalled it. I was out $349.00. Plumbers ain't cheap on Sunday afternoons during the Christas holiday.
For $349.00 you received a priceless memory.-
 3
3
-
 1
1
-
-
Reasonable price.
-
This rabbit had really bad experience.
-
1
-
 2
2
-
-
A compact pistol means to me a carry pistol.
A carry pistol means to me my life may depend upon it.
Therefore the only magazine I would use is the pistol manufacturer magazines made for that pistol.
-
2
-
-
1 minute ago, The Original Lumpy Gritz said:
Did you shorten the hammer cocking rods at all?
No. Quit while I was ahead. I’ll see how it shoots this year. Perhaps I’ll get my courage up by next winter to work on the rods.-
1
-
-
State match. Stage instructions, “Shooter starts with both hands on hat.”
The Shooter (me) takes off his hat and holds his hat with both hands on his chest. TO gives him (me) a stern look. BEEP! Shooter (still me) places his hat back on his head before proceeding to shoot the stage.
-
1
-
9
-
-
14 minutes ago, Nostrum Damus SASS #110702 said:
Have you polished all of the mating metal surfaces? Particularly nasty and in need of polishing are the two shafts of the extractor and their channels, and the cocking rods and their channels. AND all mating surfaces of the barrel hinge mechanism.
Yes on the extractor shafts. No on the rest. I’ll see where the wear marks are after using this SASS season. I’m chickening out by quitting while I’m ahead on this project…polishing the cocking rods…hmmm.
Thank you very much in taking your time posting your excellent advice.
-
1
-
-
Final Report.
The replacement Lever, Hammer and Sear Springs I bought from Shotgun Boogie Gun Works. I replaced all five OEM springs with the SBGW springs. The only problem I had was after I replaced the Lever Spring, the action would not open (note test first before reassembling the side plates and stock). Reinstalled the the OEM spring with the SBGW Top Lever Spring Plunger, the action still would not open. ?!?! Reinstall SBGW spring with the OEM Top Lever Spring Plunger, reassembled the side plates and butt stock and (insert drum roll) the action now opens as it should!
Final test. Took the CZ to the fire range today. I shot 40 shells of Winchester Universal Heavy Lead Load (steel base) and 10 shells of Winchester AA light target loads (brass base). Ran 50 shells though it and they all went bang! I was really surprised the brass base AND ESPECIALLY the steel base empties shucked out of the OEM chambers!
The barrel selector on the safety started to chew into my thumb. I solved that problem by moving the barrel selector from the left to the right barrel.
Before changing the springs it took both of my hands and a knee to open the action. After changing the springs it takes two hands with a little effort. I'll use the CZ for this year's SASS season to break it in before considering messing with the Hammer Spring Pins.
The nuts on the end of the Hammer Spring Pins were staked. Bits of leather in the jaws of the pilers (to prevent chewing up the pins and nuts) got the nuts "unpinned". Reused the leather and pliers to reassemble otherwise the assembly would be longer then OEM.
Right thumb pushes the Top Lever open. Left hand pushes the barrels downward with a stiff right wrist. Left hand heads to the shotgun shell belt as the right wrist shucks the empties out. Left hand pushes up on the barrels to close the action. BOOM. BOOM.
I can't close the action with just the flick of right wrist like I can on my TTN. Time will tell.
-
2
-
-
17 hours ago, Nostrum Damus SASS #110702 said:
…the lever spring and plunger are super easy to replace. I don't have the opened action in front of me, so forgive me for doing this purely by memory. On the right side of the receiver, you will see the end of a solid pin that goes in at an angle…..
This one?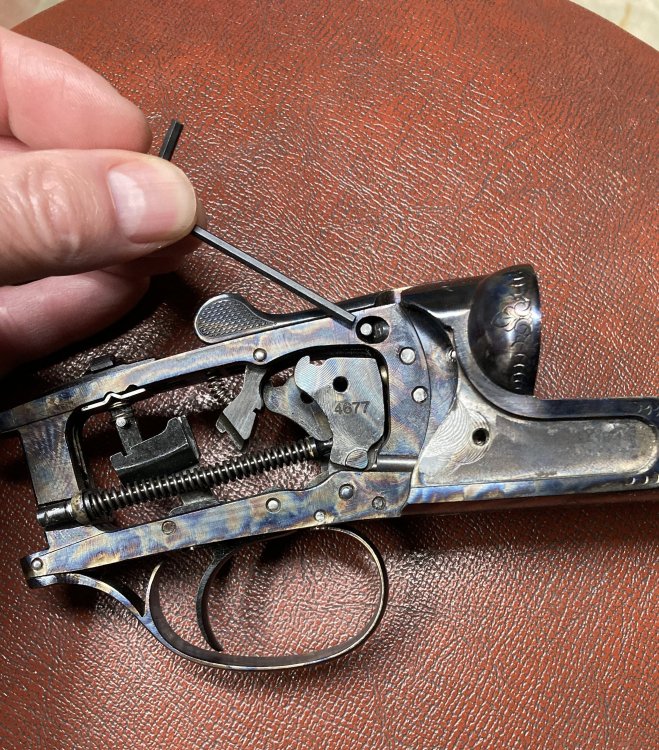
-
On 1/21/2024 at 7:53 PM, Nostrum Damus SASS #110702 said:
… if you take off the spring tension. I did it by drilling a hole in a small block of hardwood, large enough for the cylindrical nut to pass through, but small enough so that the rear spring collar does not….
I adapted your idea to a spray can lid.

-
3
-
-
Well the forth stubborn side plate screw must have felt threaten by the Kroil and Impact that's being delivered tomorrow. It decided to cooperate and I was able to removed it.
Here's the replacement parts I received. 1 & 2 are the "Hammer Springs". 3 & 4 "Sear-selector springs". 5 is "Top Lever Spring". 6 is "Top Lever Spring Plunger". Part names were derived from a CZ online parts list.
#1 Question (HELP). Evidently the "Top Lever Spring" is buried someone within because I can't see it. How do I get to it to replace it? I'd rather not start an overall disassembly risking partts flying across the room only to discover there was a correct method of doing it.
#2 Question, "Sear-selector springs". Replacing would contribute to making the action easier to open or should I just stay with the stock springs?
-

-
2
-
-

-
4
-
1
-
-

-
3
-
-
31 minutes ago, Tennessee River said:
My side plate screws were tight as ______(fill in the blank). I buggered them up, but contacted CZ via email and they sent me free replacements. If you call their customer service they will give you the email. It’s only a single busy guy doing the CZ shotgun parts, but he will come through in due time.
That’s good to know. Thanks for posting.
-

-
1
-
1
-
-
Like Gus chasing buffalos over the hill and disappearing. Only to come galloping back being chased by Indians.
-
Impact driver and Kroil ordered. I’ll let y’all know how this all works out.
-
On 5/5/2022 at 9:14 PM, Charlie T Waite said:
…If you or someone you know is serious about fighting for America's freedom to keep and bear arms and who may be interested in being a Team SASS State Director, please reply to this posting with your alias, SASS# and email address….
Matthew Duncan. SASS# 23189. rrloucks@gmail.com. Indiana-
1
-
-
Just placed my order!
-
On 2/2/2024 at 3:41 AM, watab kid said:
…as they really did vote their own problems in , you could vote them out you know ?…
Assuming only legal votes are counted. -
On 1/20/2024 at 12:16 PM, Nostrum Damus SASS #110702 said:
...1. Remove the buttstock (this is simple but you need a long ratchet extension to reach the bolt inside with your 13mm (? 12mm? 13, I think) socket). To do this, carefully remove the factory rubber butt-pad with a regular Philips screwdriver through the two small holes in the pad. Remove the stock-retaining bolt -- it can be very tight. Then VERY CAREFULLY remove the side plates with the correct hollow-ground flathead screwdriver, and keep straight which screw comes out of which hole, as they are all indexed. Once the side plates and bolt are removed, VERY CAREFULLY remove the screw in the trigger guard tang using the same correct hollow-ground flathead screwdriver. The butt stock now comes off of the receiver easily....
Today is the day I try not to ruin a brand new SxS.
Butt-pad removed. 13mm socket removed the "Buttstock bolt". Removed the two bolts that held the left side plate and removed the left side plate. Right side plate I was only able to remove one of the two screws. Now I'm researching manual impact drivers that accept 1/4" bits while the WD-40 soaks the stubborn bolt.
-
On 12/10/2023 at 5:58 PM, Widder, SASS #59054 said:
Older and not wiser ME plans to be there. Will there be a 'rocking chair' stage?

..........Widder
IF there is a minimum of FIVE pre registered ten days in advance of the match…")
-
2
-


CZ Hammerless Sharp-tail extractor mod - Part 2
in SASS Wire
Posted
Enough that it could be possible to interfere when closing on empty chambers. I’ll thinking a wide shim between the flat part of the rod and set screw might solve that problem.